Journal Entries
This section will cover adding the Journal entries into the CS for the Lost Book quest. I like to do this first because most of the dialogue and any scripts we need will probably depend on or call these entries, so it’s best to have them in place before we try to write the actual quest.
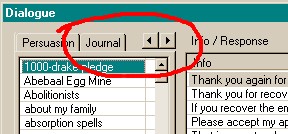
- 1. See the little arrows near the top left corner of the window? Click on the arrow pointing right until you see the Journal tab. Click it. The Window will change to what's shown below.
Contents
1. Introduction and
Background
2. General Quest-Creation Tips
3. The Sample Quest
3.a. Adding the NPC
3.b. Adding the Book
3.c. The Dialogue Window
3.c.i. Journal Entries
3.c.ii. Greetings
3.c.iii. Topics
3.d. The Script
4. Testing Your Mod
5. Additional Tweaks
6. What Tribunal Added
7. Final Notes
8. Glossary and Links
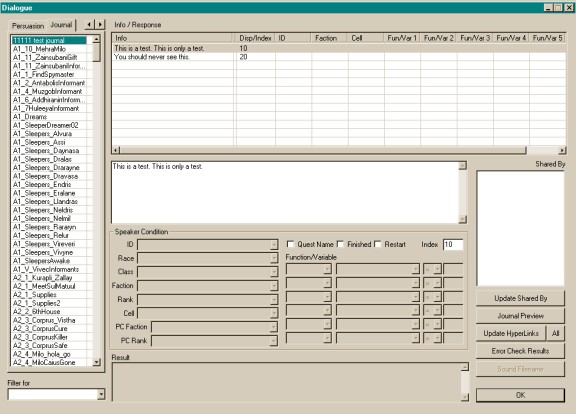
- 2. Click on a few of the existing Journal items if you want, just to see what they are. You’ll notice that most of the boxes in the bottom part of the screen are grayed out. That’s good! We’ll get to those later. You don’t have to worry about that stuff for the Journal entries. The three check boxes (Quest Name, Finished, and Restart) were added with Tribunal. If you don’t have Tribunal or the GOTY edition, they will not be there. It’s OK, that’s just how the newer functionality of sorting the journal by quest was added. The section "What Tribunal Added" covers these in more detail.
- 3. Before we add the actual entries, we need to make a new Journal category in the long list to the left. Right click anywhere in there and choose “New”. Type in a unique name for the set of journal entries. ** Make sure the name you choose isn’t the same as any topics! Another good reason for using the initials naming system! I chose “sd_lostbook”. Hit enter or click outside the list, and the new journal item will be sorted alphabetically in the long list. Find it again and click on it.
- 4. Now we need to add the Entries, or what will actually appear in your in-game journal at certain points of the quest. Note: make sure the “Filter For” drop down box at the bottom left of the window is BLANK. If it isn’t, click in there and scroll to the top of the choices to find the blank entry.
- a. Right click on the first empty line of the empty “Info/Response” box at the top of the window and choose New. You’ll get a cursor on that line, but it’s easier to type in the big box below, so click in there and type the following: Madera Hleran in the South Wall Cornerclub has asked me to find her personal copy of “The Vagaries of Magicka”. She thinks she may have left it in the Ald-Ruhn Mages guild, but she’s not sure. She promised me a reward if I find it.
- b. When you’ve typed that in, click in the little box titled “Index”, and put in 10. Basically, the journal entries act like variables, and you are “setting the value” of this particular entry to 10. You’ll see why this is necessary when we get into adding actual dialogue. If you forget to add an index, you’ll get errors on loading either the game or the CS. Don’t hit enter here, because the dialogue window will close and you’ll just have to open it again. You don’t have to use 10, 20, 30, etc, you could use 1,2,3 or 2,4,6, as long as the journal entries go in numeric order. Meaning the first journal entry that appears in-game should have the lowest index, and so forth.
- c. Go redo step (a), except this time type: I found Madera’s book underneath a bed in the Ald-Ruhn Mages guild. I should take it back to her.
- d. Redo step (b), except set the Index for this entry to 20.
- e. Redo step (a) again, except this time type: Madera thanked me for finding her book and gave me some gold as a reward.
f. Finally, redo step (b) again, but set the index for this entry to 30. When you’re done, your window should look like the following:

- 5.
That’s it! Easy, huh? The Journal entries should now be taken
care of. It’s time to move on to the unique greetings for this
NPC.
6. Save your mod!